Oppositions – exhibition documentation

I’ve updated my main website with image and animated documentation of the Opposition works…. click HERE to go visit!

Posted in Exhibitions | Leave a comment

Oppositions 2011-2040

MKG127 is pleased to present Imaging Saturn (Oppositions 2011-2040) by Risa Horowitz and in the front space,Twins by Ryan Park.

Opening Saturday February 16 2-5 PM.

For her third solo exhibition at MKG127, Risa Horowitz presents her ongoing research as a novice amateur astronomer and astro-photographer, and her first collection of drawings. The work arose from her experience of seeing Saturn through a telescope for the first time in May 2010 – a profound and sublime personal experience that raised questions about the incomprehensible scale of the universe and our ability to make sense of that scale in concrete or intuitive ways.
Horowitz will capture one photograph of Saturn through a telescope for each year of the planet’s orbit around the sun: 29.42 years, with images from 2011 and 2012 included in the exhibition. The suite of 29 drawings depicts Saturn at three fields of view, at midnight on the day of its opposition – its nearest annual approach to earth, directly opposite the sun – from 2011 to 2040.

Horowitz3front01_wp

Risa Horowitz recently relocated to Saskatchewan where she is assistant professor in the visual arts department at the University of Regina. Her work has been exhibited across Canada in a variety of public galleries and artist-run-centres, as well as internationally in Australia, the United Kingdom, and the Ukraine. Horowitz has received numerous grants from the Canada Council for the Arts and several provincial funding bodies, and was the 2006 recipient of the K.M. Hunter award for excellence in Visual Arts.. Work from the Imaging Saturn project is also currently being exhibited at the MacKenzie Art Gallery in Regina (until April 2013).

Posted in Uncategorized | Leave a comment

Imaging Saturn at the MacKenzie Art Gallery

I spent a good deal of September through November preparing my work for installation at the MacKenzie Art Gallery as part of the exhibition Synthetic Age. The show, curated by Jeff Nye, is a collection of works by Fine Arts Faculty at the University of Regina and First Nations University of Canada and it has been installed in two stages. The show opening is Friday, January 18th and that evening will also launch the current season for New Dance Horizons.

My piece is the largest wall piece I’ve created and is unusual for me in that I typically do not work al dente – usually my works are completed well in advance of installation, but since this is a site-specific work that will exist only for the duration of the exhibition (until April 2013), I had the opportunity to make the work on site.

Back in June when Jeff asked me if I’d be interested in further developing the wall vinyl I installed last year at FNUGallery on the 70 foot-long wall of the Kenderdine room at the MacKenzie I was just a bit intimidated! It is a huge wall, and it also serves as the context for New Dance Horizons performances throughout the season (I’ll post more images taken of the work during these performances as they happen).

So, the work:

mac_northeast-full

northeast view at the MacKenzie Art Gallery with dance floor installed

mac-detail_03

detail of installation at the MacKenzie Art Gallery

wall-text-Mac-screen-shot

screen grab of wall text used for MacKenzie installation

The piece is a vinyl installation spanning 70′ using a stacked image of Saturn (22/720 possible frames) that I photographed on May 11, 2012 at 10:35pm in Richmond Hill at the David Dunlap Observatory (see the ‘From’ coordinates above) using the largest optical telescope in Canada. The telescope has a primary mirror measuring 1.88 meters (74″) and has an effective focal length of 33,000mm. The wall text reproduced above is installed at the gallery and identifies technical and factual data of the moment when the images were collected including Saturn’s position amidst the zodiac and relative to earth and the sun.

I used Keith’s Image Stacker, and modified the image using Photoshop only to invert the image horizontally and rotate it, to correct the inversion caused at the mirror by the eyepiece of the scope. I used my Nikon D7000 at prime with a .75 focal reducer – you can read my blog post from that night here.

Jeff and Timothy Long, the Head Curator at the MacKenzie were really instrumental in working through both technical and aesthetic aspects of the installation. We met several times to test for the size of the printed image and to discuss my various ideas for the design of the vinyl strips, working through the logistics of mounting 70 and 55 continuous feet of adhesive vinyl. The preparatory team at the MacKenzie is fabulous – Ralph gave much needed direction and Peter, along with Jeremy from Advantage Sign and Graphics, did the physical work.

So many ideas arose during my conversations with Jeff and Tim. I had quite spontaneously mocked up a sketch using the long horizontal line, which initially referred to a horizon line – be that in the prairies, or more generally. Tim liked the way the two lines also refer to the the ecliptic and the orbital path of the planet, though these aren’t arranged in my installation using those specific coordinates. Once the work was up I was amazed by the way the wall seemed to disappear within the dark intersection of the two lines; the planet seems to hover in that dark void. It is a very simple yet contemplative piece that reveals the complexity of both its creation and the scale of the solar system. I can’t wait to create my 2013 image!

I’d like to make a special thanks to the volunteer crew at the DDO and RASC Toronto Centre who have become great mentors and partners in learning and disseminating knowledge about astronomy, and without whom I would not have had access to the DDO scope. I look forward to my visit next month, and spending some time in summer with you all learning how to use my CGEM! I would also like to acknowledge the Saskatchewan Arts Board, which awarded me an Individual Artist Grant to produce this work, and Imaging Saturn (oppositions 2011-2040), which will be debuted at MKG127 Gallery in Toronto on February 16, 2013.

    Pacing Time at the MacKenzie

Pacing Time at the MacKenzie

I’m also exhibiting Pacing Time at the MacKenzie Art Gallery, which debuted at  MKG127 in 2010. I made these works with the impulse to highlight the interplay between the adventure of creation and the routine activity of simply passing the time. As if being-in-the-moment is too factual a predicament of/for being. These works describe my preoccupation with time, space, and chance. Eight objects that have some playful scientific significance are put in to motion and stilled through this collection of 8 pairs of digital chromogenic prints, and accompanying high-definition video.

Posted in Exhibitions, Images of Saturn | Leave a comment

Correct Orientation

Edited 17 November.

I sent a request to the list to get this right. James Edgar sent this image; the moons from left to right are: Rhea, Tethys, Dione, & Titan

Correct orientation of Saturn if seen with naked eye from earth, as per James Edgar…

My SkySafari shows the following:

That is: with NO horiztonal or vertical flip selected.
Here is an image from my D7000 on May 11, 2012. The only modification I have made is in the exposure settings, to reveal the moons, and to label them.

from dSLR, no flipping or inverting, just levels and moon labels.

And here is the same image flipped horizontally, and rotated to match approximate ring angle.in Photoshop to orient the moons correctly [as per both J.E. sky shart software screen grab and my own]:

D700, flipped Horizontally, and rotated, in Pshop, shot on DDO scope with mirrors bouncing the light out of a side visual exit of the scope.

Okay: so with this setup at the DDO [prime dSLR connection, mirrors bouncing the light out the side of the scope], all I need to do to orient the image is a horizontal flip.

So with my successful stack:

Posted in Uncategorized | Leave a comment

first real stacking success!

Wow does it feel great to have some modicum of success in learning how to stack images.

Details:

  • Keith’s Image Stacker
  • 30 second, 1920×1080 .mov file captured with Nikon D7000, May 10, 2012, 10:35:11pm, David Dunlap Observatory .75 focal reducer [same night as images from this post]
  • 175 hand-picked frames.

I went through some trial and error getting Keith’s working. The first image I ever imported was something like 240px wide, and every image thereafter opened at the same dimensions. I trashed the prefs [instead of re-installing] and this allowed me to open the larger files at the correct dimensions. So: in the documentation where Keith notes that the image dimensions will be those of the first file you open, this doesn’t mean per session, it means ever. Computer>Library>Preferences….

Then, when importing, with 1 and 2 threads, Keith’s would hang up at some point. Thanks to John’s computing prowess, I manually imported, and when I hit 175 frames, the software hung up again. I guess that’s the limit for this software. I started over and selected the best 175 frames I could discern in that tiny import frame [previewing the video helped me to confirm a roundabout set of frames, at 24fps].

I identified and selected my best reference frame, and did a Difference Sort – nothing seemed to happen. Then I did a Value Range sort – nothing seemed to happen. So I went ahead and stacked all 175 frames.

I saved as a PICT file [311KB, won’t work for the MacKenzie install], and also exported as 3-channel FITS, and as RAW.

To open RAW in Photoshop: input the export data, use IBM/PC byte order [not mac!], and do not colour manage.

Photoshop won’t recognize FITS format on its own, and a quick web search lead me to this site, where I downloaded the awesomely named FITS Liberator for mac. Of course, it only supports CS3 and CS4, and I have CS5.

Here is a .jpg from the raw file [via .psd, Adobe RGB (1998)].

©Risa Horowitz 2012

first successful stack. no post-processing outside of alignment and stacking.

Tomorrow night I’ll export some tests with fewer frames, and prepare some files for output tests to vinyl in preparation for the MacKenzie Art Gallery faculty-wide exhibition we are installing at the end of the month [curated by the most wonderful Jeff Nye]. More blogging will follow….
Addition, 8 November, 2012. I did a bit of post-processing, here’s a sample from a 22-frame stack of the best frames from those 175 original selected:

22 frames stacked from the 175, some post-processing

Posted in Images of Saturn | Leave a comment

Humbled

Well. I left campus at around 8pm and the sky looked awesome, as did the forecast (awesome being not below freezing) so I emailed Chris B. and we coordinated observing at his preferred dark sky spot not far out of town. I scrambled to fix dinner, put myself together, and get back to campus to load my gear, and off I went.

My phone rang as I was leaving town on #33 and Chris was just heading out [“Hello?” “Hi where are you?” “I just passed your house, wtf are you?!!” said excited, to go observing before the deep freeze] so we agreed I pull over and he would honk at me as he passed to caravan. I’d been to this site only once before [I think], and was not completely confident I would find it. Saskatchewan grid roads are really dark at night. I ended up looking at Sky Safari on my handheld and thought I heard a honk, but didn’t actually see Chris’s red car, so I just pulled back on to the road and carried on.

I did drive with the heat mostly off [re: Rob C.] and opened the rear window a few inches to help the equipment cool down a bit from room temperature. I spotted the sign to Kronau (20km). I tracked the distance to Lajord (another 15km from Kronau), and turned right on to the grid road. There, I tracked 11km, two bridges, and two cross-roads before finding a set of grain bins on the left. It didn’t look like I remembered it looking [weren’t the grain bins parallel to the road?], but I didn’t trust my gut and so I just figured Chris was behind me, that that wasn’t a honk and he’d show up soon, and I began to set up. I’m not sure why I didn’t get back on the road and give myself five more km, just to see, because it sure would have been nice to find Chris out there in the dark. Anyway. Here’s what that looked like:

Wrong Silo Blues

Aside from being able to see Polaris in my polar finder scope, just about everything about my setup was wrong.

With a rough polar alignment I attached the mount in an orderly fashion, and then the optical tube assembly (OTA). My eyes were not dark-adapted and I don’t have a headlamp. I loosened the dovetail too much and the two bolts and left portion of it fell on the ground. I don’t think I did a great job of removing the dust/dirt from it, so will have to clean today [I suspect this because of the sounds made while removing the OTA later].

I forgot to use my polar finder scope before attaching the OTA, which is not the end of the world, but the lighter weight might make it easier to turn the azimuth knobs. I was able to not-to-awkwardly reach around with my red-light to illuminate the reticle, but the problem remains that I don’t know what is the correct way to position the etching. Do I spin the entire piece out of the housing? Do I turn the focus eyepiece? I don’t know. I also could not quite see the Big Dipper through the polar finder scope, so aligning it to the etching didn’t happen, really. But I spun the thing in its housing to generally match the position of the constellation in the sky, adjusted the alt-az and placed Polaris right in that little circle, and locked the mount down.

I powered up the mount and after fumbling a bit with the hand controls I took a car break to review parts of the manual [I wasn’t being prompted to enter my geo co-ordinates so needed to review: after pressing ENTER to confirm the mount is lined up, hit UNDO to enter updated date, time, and position].

I chose the Two-Star alignment and the first star in the west that the mount suggested was Vega, which I could identify with my naked eye, remembered it was bluish, and confirmed with Sky Safari. The scope slewed, but then the real problems began.

I could not identify Vega in the finder scope, and I could not identify Vega in the 40mm eyepiece of the telescope. After many attempts at re-setting the starting position of the mount, re-slewing to Vega, trying to operate the hand-controller to move the RA and DEC axes, I was hopelessly lost. My big problem was that I had not aligned the finder scope with the telescope, and try as I might with Vega, I failed.

I tried a couple of other stars, none of which as bright as Vega, and failed. So I figured if I could centre that glowing Jupiter in the eyepiece, and align the finder scope, I’d have an easier time with the two-star alignment. So I slewed to ‘Jupiter’ – so noted because I knew that without a polar alignment it would not slew accurately – figuring it would be easy to spot in the eyepiece. Not so. I used the hand controller to slew left, right, up, down, in every combination, asked the mount to re-slew to the planet, tried to eye the position of the OTA itself. Nothing I could do got that taunting planet in my eyepiece.

Another problem was the height of the OTA, and finder scope. In Grasslands I hadn’t extended the tripod legs at all, so there was a lot of stooping. I had the opposite problem last night: I extended the legs too much, and couldn’t reach the finder scope!! A step-ladder would have come in handy, and at some point I started standing on my tool box [hesitant to get dirt all over it with all that fancy stuff inside].

So, here’s my tally of what to learn:

  1. how to use the darned Polar Finder Scope – what is the correct method of rotating the PFS to get the etched reticle into position?
  2. how to align the regular finder scope to the telescope, and at what stage of the setup?
  3. develop an ‘eye’ or an expectation of what guide stars and planets *should look like in the magnified finder scope, 40mm, and 24mm eyepieces.
  4. um, the basics of naked eye observation, identifying guide stars, and learning enough about what’s around potential guide stars to be able to hop around with the finder scope to identify and centre them
  5. the hand controller: il faut fair patience ! Basic menu commands, and, importantly, how to control HC movement speed and directions.

On a nicer note: I saw two fabulous meteors, the milky way was discernible, and the sky is pretty beautiful. On the drive back out the fog was amazing – wisping across the road, with the fog ceiling ranging from ground level, headlight level, eye level, above the head. Which reminds me: I really should get a dew shield, eh?

Better luck to me next time.

prairie fog

Posted in Imaging Equipment and Telescopes, Observing | 5 Comments

Celestron Polar Finder Scope

So. I think I managed to align the axis of the Polar Finder Scope with the polar axis of the CGEM mount.

There were a few mishaps and holdups.

In Grasslands last weekend I learned that my compact allan key set did not have a key that fit, and while Kevin loaned me his I gave up quickly, and also became annoyed that the PFS is not sold illuminated (useless otherwise).

This afternoon I figured that to get started I needed to find the correct size allan key. But when I pulled out the scope upon arrival, it appeared to be missing two of the three reticle adjustment screws. So I hitched a ride with Ned and John to B&E to replace them. B&E did not have a set of allan keys, but we found imperial screws that fit, though couldn’t tell if they were getting caught up, or were depressed as much as they could be. So we found another little hex toolkit to try to remove the last remaining adjustment screw and ooops. I turned it the wrong way and it went and fell in to the body of the polar scope.

Handy B&E dude showed me how to simply unscrew the entire eyepiece, and we found all three screws at that point. It seems that one scratched the far end of the glass, but along the edge, not in the centre. When I put it back together the screws held the entire eyepiece in place – so that it could not be spun around, apparently to focus. This confused me.

How, I needed to know, am I supposed to orient the reticle correctly to align it with the big dipper (thinking that this was the task of the eyepiece, after confirming that the year/date chart were useless), and with Polaris, if I can’t move the thing? I eventually read the “Using the Polar Finder” section of the two-page instruction manual to learn that
all one needs to do is to move the RA axis until the pattern matches the orientation in the sky. Then use azimuth and altitude knobs to get Polaris inside the circle. I suppose, then, that the RA axis alignment marks become void, since the new position of the RA should probably not be changed once Polaris is positioned within the scope, and thus the mount more finely polar aligned. I will have to sort this part out.  update, 10 March 2013. I just posted this today, and looking back realized I’d forgotten I identified moving the RA axis back in October. However, my supposition was wrong: once Polaris is positioned in its circle in the polar axis finder scope, return RA and DEC to home position, with arrows aligned, then power up and run through the 2-star (then ‘all star’ if preferred) routine.

So. I took out the mount and tripod and chose the fartherst object I could see from the concrete sculpture pad on the academic green. I find controlling the altitude adjustment bolts to be a pain. The big fat one at the back moves the altitude up just fine, once the smaller front bolt is loosened. But the only way I can figure out how to move the altitude down is to simply loosen both and push, in the small increments it permits. The azimuth knobs are a little less finicky, though it moves more smoothly clockwise than counterclockwise (I just now read that only at this point should the mount be tightly bolted to the tripod. It’s the last instruction).

Once I’d centred the object, which had a handy cross-shape at right angles, it dawned on me that I’d chosen the wind tubrine. I held my breath and hoped the wind didn’t pick up and proceeded. Then I read the part that I’m not trying to centre the cross-hairs on this object, but on the axis of rotation. Okay.

It took more than the 3-4 swings back and forth of the R.A. axis to get close, and maybe because I feared completely loosening and loosing, or tightening and loosing again within the eyepiece, those tiny screws. And I didn’t get it *perfect*. But I got it pretty darned close.

I have very little confidence that the Polar Finder Scope is sturdy enough for those screws, or the reticle, to actually hold in place, but I put back on the caps and I am ready to rig a way to illuminate the polar axis shaft.

John has a great idea about that. In my last post I linked to Marueen’s rigged t-tube with flashlight. John wondered if I could get my hands on a small strip of photo-luminescent paper and simply cut a couple inches, loop it to fit the insert of the polar axis hole, and use a small battery to power it. That would be really cool and if Rebecca has any spare bits I will definitely try it. It would be compact, easily inserted and removable, create no visible obstruction, and wouldn’t require any more hardware than a way to affix the battery. I’ll post about that if I get to it.

Now all I need to do is find a night to go out and actually sight Polaris using the Polar Finder Scope…..

Posted in Imaging Equipment and Telescopes | 4 Comments

New Telescope CGEM 800 HD 8″ + First Trip to Grasslands

After a very busy summer in Toronto [during which time I wrote and defended my PhD dissertation paper], I am back in Regina. Classes have begun again, the new semester is busy as usual, and I went and bought myself a telescope.

The CGEM mount is a computerized German Equatorial mount that weighs 41lbs. With the tripod and 8″ Optical Tube Assembly (OTA) the package weights almost 90lbs, and my first concern when Chris B. suggested this mount was the weight. I visited a local club member, Hao, who has the same mount for his 9.25″ OTA, and he showed me the basics of putting it together and I was able to lift the mount and confirm that I could do it.

When the packages arrived [there were five, including the Celestron PowerPack17] the OTA box had evidence of a pretty serious drop – 4″+ of one end were compressed. The innards looked fine, and once set up everything looked and operated fine [I didn’t check the collimation but Chris said it’s slightly off].

I set the whole thing up for the first time in my studio only one day before departing for a weekend in Grasslands National Park, which is an amazing place for camping and hiking, and it’s a dark sky preserve. Chris and the club have developed a nice relationship with Park Staff.

Posing with my newly assembled CGEM with 8″ OTA [sans finderscope].

I ran around the night before the trip to buy some important accessories: a tool case, a tarp and some bungee cables. The only thing I forgot was a dew shield, but luckily I didn’t need it.

The trip to Grasslands was organized by Chris B. Vincent was there, as was Cathleen from the S’toon club [who was amazingly encouraging and shared in my excitement, and whose lovely drawing will adorn the back cover of the 2013 Observer’s Handbook], plus Sarah. Kevin and Tanya arrived late Saturday, but didn’t get to see anything because of the clouds.

After setting up camp there was enough light left to assemble the scope on site. I did a rough polar alignment by orienting the post on the top of the tripod head towards north, using my iPhone compass application [which also showed the GPS coordinates, handy, though using both depends on having a cellular or wifi signal]. I then leveled the tripod using a combination of both the built-in bubble level, and a small level that I purchased to be able to compare. Vincent helped me mount the Finder Scope, which I’d had trouble with in my studio for some reason, and he pointed out that I hadn’t aligned the Finder Scope itself to the telescope, a task he helped me with on Saturday afternoon [thank you Vincent].

I attempted to do a more accurate polar alignment using the polar axis hole. While I set the mount at my latitude, I could not see Polaris with my naked eye through the polar axis hole. I should have spent more time adjusting the azimuth, but found it awkward to do so with the knobs [must get a feel for them]. I suppose I should have been more determined at this point, since without having Polaris even within the empty polar axis hole, my attempt to use the Polar Finder Scope was doomed to begin with.

The Polar Finder Scope fits in to the polar axis and has an etched reticle within it. If it is balanced within the mount [a process I did not do successfully], and positioned properly [a step I have not figured out how to accomplish as of yet], I should be able to adjust the latitude and azimuth on the mount to position Polaris within the proper place on the reticle, thus gaining a more accurate polar alignment. But, when I looked through the finder scope in the dark, I couldn’t see the etched reticle. This is what I’ve learned:

  1. be as accurate as possible with the rough alignment, take my time with the compass and leveling the tripod/mount
  2. learn how to sight Polaris with my naked eye through the finder axis hole before attempting to use the Polar Finder Scope [being sure to take note of the difference between my real latitude, and what the latitude scale ends up reading]
  3. do the mount balance in daylight somewhere nearby
  4. figure out the correct position of the reticle within the axis hole
  5. illuminate the thing! Maureen from Hawaii on the Yahoo CGEM list sent a link to her awesome hack for this – I will definitely try it.

After confirming that I couldn’t get a more accurate polar alignment, I went ahead with the Two-Star Alignment procedure using the handset of the mount [HS]. Of course, I didn’t take note of which stars I chose, but I went with the ones that the computer suggested, and added only one calibration star. This isn’t as accurate as several calibration stars, but a good first run for me to see what the mount could do with limited calibration.

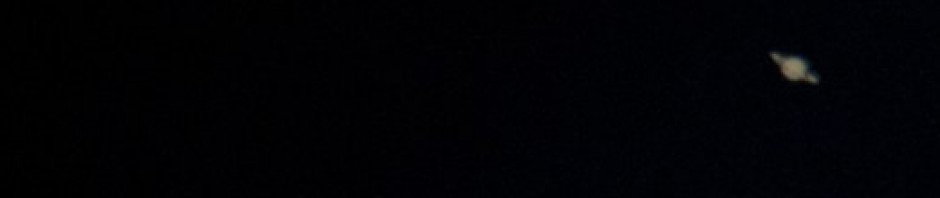
Everything slewed to within the field! Not centered, but within the field. It was great. I took the auto tour, selecting one object after another to slew to and peer at. We visited Jupiter as it rose, and a couple more times as it rose. By midnight I was able to discern two red bands and it looked pretty beautiful. I left the scope a couple of times, for up to half an hour I guess [hot chocolate breaks!], and it was still tracking whatever object I’d left it slewed to. I didn’t bother trying to figure out how off the tracking was, but after half an hour to have the object remain in the field of view is an amazing feat of technology.

At the last minute I picked up a cheap eye patch, and I used it. I find squinting awkward and tiresome so I will look for a better eye patch. But it let me leave both eyes open while completely darkening the patched eye, and this made looking through the eyepiece so much easier.

Saturday afternoon I spent more time seeking a rough polar alignment, and waited patiently for night fall at which point the clouds rolled in definitively, and there was no viewing. I covered the entire assembly with my tarp, but ended up nerve-wracked all night fearing the light rain would damage the gear and kicking myself for not packing up at least the OTA before bed. When I left the tent at 4am expecting to get wet [the sound of the rain inside the tent was moderate], it was still dry out there. A fraction of a millimeter of rain in the Grasslands doesn’t go very far, I guess.

So: all in all an amazing first weekend out with my new scope, and I understand so much more than I did four days ago. I will try to balance the Polar Finder Scope in the mount on campus before it gets too cold, and also try to achieve a more accurate polar alignment with the illumination hack shared, but the chances of me traveling far in to the field once winter hits are not very high, I suspect. I will contact the Science department at the U to see if I can’t set it up for the winter in the rarely-used observatory on campus. Not the darkest place to set up a telescope, but Regina is pretty dark compared with other cities, and the observatory is attached to a warm, easily accessible building that has toilets in it.

For some reason I didn’t take a picture or portrait in the field, but I will next time. Here is a link to some pictures from our hike to the Triceratops head that Chris lead us on. I’ll whine less next time and stretch first.

Posted in Imaging Equipment and Telescopes | 5 Comments

70mm refractor, iphone handheld afocal fuzzwonders

Quick post. C.V. randomly offered to loan me a  70mm refractor and brought it straight to my door today, fancy that! Really sweet of him. The sky was clear enough for me to go out on to the deck for a few minutes and point it up, just now. I managed to sight Saturn very quickly with the 10mm lens, seeing for the first time [odd] the speed of the earth’s rotation through a completely manual scope. I couldn’t manage to control the position of the scope well enough to find it with the planetary astro-cam so I tried to capture some pics with the phone camera. By the time I retrieved it I’d lost the planet and spent more time than I felt I ought to have needed to find it again. Like, 5 minutes. My mother happily came outside in her pajamas to take a peek. Below is a slightly adjusted [brightness, contrast] and cropped image from the iphone, using the darker of the two HDR images, which captured a double image, or, well, a ghosted specular oddity. Which reminds me, Jeff Nye asked me how I feel about monumental image scale today, planning for the MacKenzie show this coming winter…

Anyway, next will be to try the planetary imager during the daytime, and take up C.V.s suggestion to see if I can’t align the finder scope, maybe that will help next time.

iphone hdr image, handheld.

Posted in Uncategorized | Leave a comment

Recent visits to the Dunlap

I visited the DDO on the night of the supermoon and introduced myself to some of the members and organizers. I managed to give a presentation last Friday for one of the members’ nights, introducing my project and getting acquainted with some of the Toronto members.

I was lucky enough to have arrived in Toronto with great timing: some members planned to visit the 74″ scope with cameras – a first for the club since it took over managing the observatory four years ago – and I got to tag along with my planetary imager and dSLR.

Here is one of those dSLR images, shot at prime with a .75 focal reducer [the focal length of the 74″ telescope at the Dunlap is 33,000mm!] processed using PShop and rotated to the close to the correct orientation:

I was thrilled to see the Cassini Division for the first time, and capture it in the photographs I shot.

Tonite I returned for a member’s viewing night and managed to capture a handful of images by projection with the dSLR.

Saturn, with Dione, Tethys, and Enceladus

The image above is obviously overexposed, but it’s the first time I’ve captured any of the major moons in an image.

Saturn, projection, partially obscured

This image, above, by projection, was processed using PShop.

I’ve downloaded Keith’s Image Stacker, but haven’t opened it yet. So much to learn!!

Everyone I have met at the Toronto club is friendly and inviting. I continue to exhaust myself with the excitement I feel about looking, and shooting, it’s great! One club member/organizer has begun to call me the Artist in Residence, and several possibilities may pan out for projects. The administration building has a beautiful, yet empty, library, within which an exhibition could be mounted. Tonite someone suggested a wall/ceiling piece. And, I looked through some of the print file drawers left behind by the UofT – they are full of printed and transparent star charts, and photographs [negative and positive]. I would LOVE to create a work based on these charts, but may need to negotiate access to them with a proper proposal….all in good time….I have 15-20k words to write about that other project first….

Posted in David Dunlap Observatory, Images of Saturn | Leave a comment